


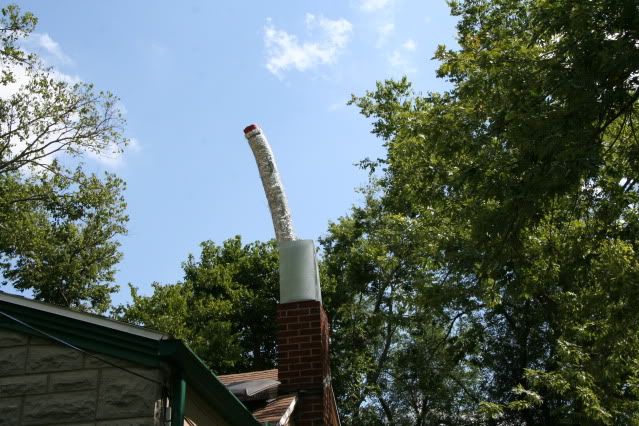
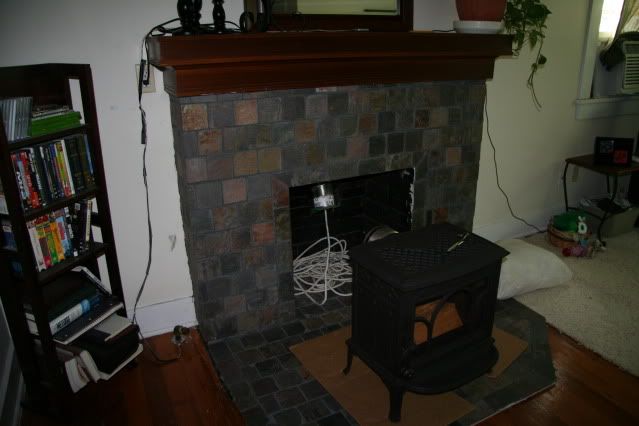
My chimney came in on friday. I was actually out of town and did not expect it so soon so it sat on my front porch all weekend. I am glad no one tried to run off with my $700 chimney liner. I ordered it from rockford. I would recommend them. the shipping was amazingly fast. I tackled the project by myself. It definitely would have been easier with a second set of hands but I am in a hurry to get this wrapped up. The video on youtube makes this look a little easier than it is, but it all worked out in the end. Just unrolling the chimney liner by myself was a chore. I wanted to get it as straight as possible before installing the insulation kit on it. Once I got it mostly unrolled I had to get all the factory oil off of it. I was affraid the spray adhesive would not stick if I didn't. Then I cut the insulation to about 172 inches so it would stop right before I got the the damper opening. I knew there was no way the liner and the insulation would fit through the hole. I did not attach the bottom termination like the video (by the way I went the applaince connector not the T). shows until I had the liner pulled through. That just looked like a good way to ding up an expensive part. once I had the insulation installed, taped and the mesh wrap secure I cut down a 2x4 to fit inside the bottom end of the liner. I also driller a 1 inch hole through the board. then I ran a roap with a knot in the end through the hole and used 4 screws to attach the 2x4 in the bottom. This gave me a way to get the liner on the roof bymyself and pull down on the liner if it got stuck in the chimney. I lugged the liner to the back yard then through the rope onto the roof. Then I climbed up on the roof and used the rope to pull the liner up. The liner and insulation is not super heavy. I would guess around 50-75 pounds but its still pretty akward. I dragged it over the chimney Then through the rope down the chimney. Then I huffed and puffed and chiggled and shoved until I got it through the top portion of my chimney extension and started down the brick part of the chimney. I actually got it all the way down in about 5 minutes. It got stuck a couple times but I never had to go down and pull on the rope. I got it all the way to the damper opening with out having to go down. then is just needed a small tug down there and it was through. I stuck the insulation about 4 inches from the top of the liner so I could just pull it all the way down and cut off the excess from the bottom rather than the top. It actually worked well doing it this way. I hopped back on the roof and shoved it the rest of the way through. Then I got the top part of my chimney extension and attached it. and tightened the hose clamp around the liner. it all went pretty smooth. Then I climbed down and figured where I needed to cut the liner off. I used a grinder with the cutting wheel. It blasted right through it then I attached the appliance connector at the end. Then I went back up to the roof and smothered all the joints in roof tar/plastic stuff. I don't want to have to deal with a leak. I took me all day but I got it done. Now I can honestly say I am ready to burn in this if I had to. I still need to make a damper block off plate and trim around the hearth but I am not giong to get in a rush to do that.

No comments:
Post a Comment